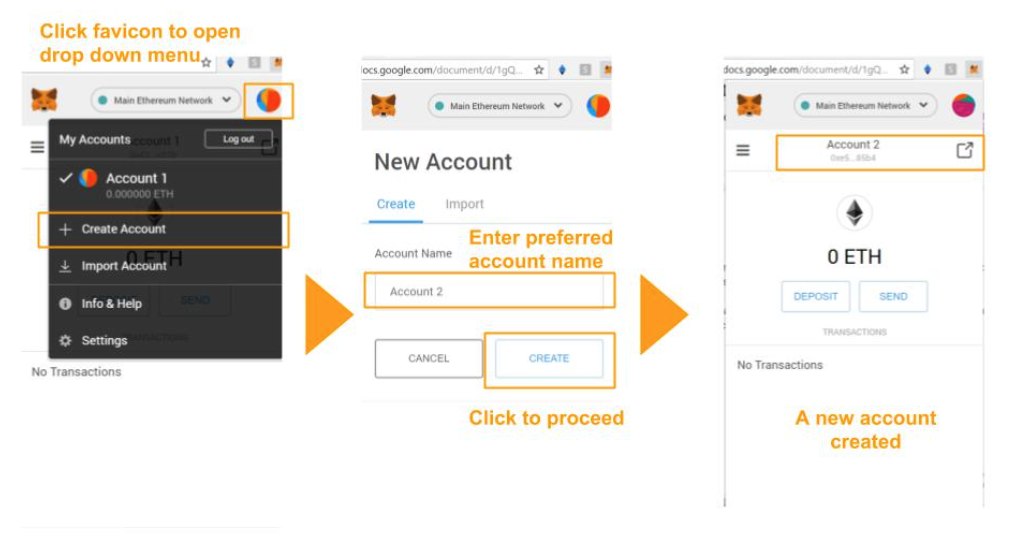
How To Metamask Rreate New Wallet
MetaMask is a well-known name in the cryptocurrency field, distinguished by its fox logo that moves with your cursor across the screen. Since its introduction in 2017, several crypto and NFT enthusiasts have used the wallet.
MetaMask is a cryptocurrency wallet program that communicates with the Ethereum network. It allows users to connect with decentralized apps by allowing them to access their Ethereum wallets via a browser extension or mobile app. It may be used to store cryptocurrencies such as ETH, ERC-20 tokens such as Enjin, and even NFTs such as Axies. MetaMask may even be used to exchange tokens within an application.
Step by Step Procedure to Create Your Metamask Wallet
The comprehensive step-by-step instructions for creating your MetaMask Wallet in your browser are provided below.
The entire MetaMask wallet creation process consists of eight stages, which include installing the Chrome extension, establishing a password, obtaining our backup phrases, and verifying your backup phrases.
Read More: Effective Ways To Clean Instagram Followers
Step 1: Download Metamask Wallet
Before you can create a MetaMask wallet, you must first install the MetaMask plugin in Chrome. If you are using a mobile device, you must first download the MetaMask app from the App Store or the Google Play Store.
First Go to https://metamask.io/ and select the “Download Now” button. Select your chosen method for installing the MetaMask extension.
This article will walk you through the process of setting up a Metamask wallet in Chrome.
If you wish to install the Metamask Chrome Extension, you may see “Install MetaMask for Chrome” and click on it.
Following the procedure, you will be sent to the MetaMask page of the Chrome Web Store, where you may select “Add to Chrome.”
Step 2: Click on the Metamask Extension and Click Get Started
After installing the Metamask Extension for Chrome, you must open it to use it.
You can find the puzzle symbol in the upper right area of the navigation bar.
You may access the chrome extension by clicking on the puzzle symbol, where you will be able to see all of the extensions that you have downloaded.
Unless you discover the Metamask Extensions, scroll below.
You may pin the Metamask Extention so that you can access it immediately from the navigation bar.
To open the Metamask Extension, click on the “Metamask” extension.
Read More: Who Should i Unfollow On Instagram
Step 3: Get Started
When you click on the Metamask extension, you will be sent to the “Welcome to Metamask” page.
The “Get Started” button should be visible.
To begin using your Metamask Wallet, click “Get Started.”
Step 4: Create a Wallet
After clicking the “Get Started” button, you will be sent to the “New to Metamask” page.
There are two alternatives on the page.
“No, I already have a Secret Recovery Phrase,” says one. If you already have a Metamask Wallet, this is the best choice for you. Then, select “Import Wallet.”
The second is “Yes, let’s get started!” This will generate a new wallet as well as a new Secret Recovery Phrase. If this is your first time establishing a Metamask Wallet, this is the best option for you.
Step 5: Select “I Agree”
On the “Assist Us in Improving Metamask” page
You must agree to the Terms and Conditions before you can create a MetaMask Wallet.
All of the rules, such as how Metamask saves and gathers events, maybe read.
Step 6: Create Password
You were prompted to establish a Password for your Metamask wallet after selecting “I Agree.”
Create a new password that is at least 8 characters long.
To confirm your password, enter it again in the Confirm Password area.
Then check-in “I have read and agree to the Terms of Use” to confirm that you have accepted the rules and agree to use the Metamask Wallet.
If you have time, you may browse over the terms and conditions by clicking on “Terms of Use” before entering the rules and conditions.
To go to the next stage, click Create.
Step 7: Store Your Backup Phrases
After you’ve created a password. You were provided an introduction to Safeguard your wallet. You may view the two-minute video on Securing your Metamask wallet, which includes a brief description of the Secret Recovery Phrase and instructions on how to secure your recovery phrases.
To proceed to the next stage of the wallet, click “Next.” You have arrived at the Secret Recovery Phrase page. To uncover the hidden recovery words, click “CLICK HERE TO REVEAL SECRET WORDS.”
After that, write these sentences on a piece of paper and keep them in a safe place. If you want security, keep it on numerous pieces of paper or digitally and in multiple locations.
Read More: How To Create Your Own Hashtag On Instagram
Step 8: Confirm Your Secret Recovery Phrase
You must choose each word incorrectly in the same sequence as the secret phrases shown in the previous phases.
Check that you have picked each sentence in the correct sequence and double-check it.
After typing each phrase in the exact sequence that your secret recovery phrases require. Then, to go to the following stage, click “Confirm.”
Step 9: Start Using MetaMask
Congratulations, you have correctly finished all of your steps.
After clicking “All Done,” you may begin using Metamask right away.
You may now send and receive Ethereum using your Metamask wallet.
Follow TechR for more informative articles.